Java 语言专属指南
本指南演示如何使用 Docker 将 Java 应用程序容器化。
Java 入门指南将教你如何使用 Docker 创建一个容器化的 Spring Boot 应用程序。在本模块中,你将学习如何:
- 使用 Maven 将 Spring Boot 应用程序容器化并运行
- 搭建本地开发环境,将数据库连接到容器、配置调试器,并使用 Compose Watch 实现热更新
- 在容器内运行单元测试
完成 Java 入门模块后,你应该能够根据本指南提供的示例和说明,将你自己的 Java 应用程序容器化。
开始容器化你的第一个 Java 应用吧。
将 Java 应用程序容器化
先决条件
- 你已安装最新版本的 Docker Desktop。Docker 会定期推出新功能,本指南的部分内容可能仅在使用最新版本的 Docker Desktop 时才能正常运行。
- 你已安装 Git 客户端。本节示例使用的是基于命令行的 Git 客户端,但你也可以使用任意客户端。
概览
本节将引导你完成将 Java 应用程序容器化并运行的过程。
获取示例应用程序
将你要使用的示例应用程序克隆到本地开发机器上。在终端中运行以下命令以克隆仓库。
$ git clone https://github.com/spring-projects/spring-petclinic.git
该示例应用程序是一个使用 Maven 构建的 Spring Boot 应用程序。更多细节请参阅仓库中的 readme.md。
创建 Docker 资源
现在你已经有了一个应用程序,可以创建必要的 Docker 资源来将你的应用程序容器化。
TipGordon 是 Docker 的 AI 助手,可以为你的项目生成 Docker 资源。让 Gordon 为你的应用程序量身创建一个 Dockerfile、Compose 文件以及
.dockerignore。
创建一个名为 Dockerfile 的文件,内容如下。
# syntax=docker/dockerfile:1

# Comments are provided throughout this file to help you get started.
# If you need more help, visit the Dockerfile reference guide at
# https://docs.docker.com/go/dockerfile-reference/

################################################################################

# Create a stage for resolving and downloading dependencies.
FROM eclipse-temurin:21-jdk-jammy as deps

WORKDIR /build

# Copy the mvnw wrapper with executable permissions.
COPY --chmod=0755 mvnw mvnw
COPY .mvn/ .mvn/

# Download dependencies as a separate step to take advantage of Docker's caching.
# Leverage a cache mount to /root/.m2 so that subsequent builds don't have to
# re-download packages.
RUN --mount=type=bind,source=pom.xml,target=pom.xml \
    --mount=type=cache,target=/root/.m2 ./mvnw dependency:go-offline -DskipTests

################################################################################

# Create a stage for building the application based on the stage with downloaded dependencies.
# This Dockerfile is optimized for Java applications that output an uber jar, which includes
# all the dependencies needed to run your app inside a JVM. If your app doesn't output an uber
# jar and instead relies on an application server like Apache Tomcat, you'll need to update this
# stage with the correct filename of your package and update the base image of the "final" stage
# use the relevant app server, e.g., using tomcat (https://hub.docker.com/_/tomcat/) as a base image.
FROM deps as package

WORKDIR /build

COPY ./src src/
RUN --mount=type=bind,source=pom.xml,target=pom.xml \
    --mount=type=cache,target=/root/.m2 \
    ./mvnw package -DskipTests && \
    mv target/$(./mvnw help:evaluate -Dexpression=project.artifactId -q -DforceStdout)-$(./mvnw help:evaluate -Dexpression=project.version -q -DforceStdout).jar target/app.jar

################################################################################

# Create a stage for extracting the application into separate layers.
# Take advantage of Spring Boot's layer tools and Docker's caching by extracting
# the packaged application into separate layers that can be copied into the final stage.
# See Spring's docs for reference:
# https://docs.spring.io/spring-boot/docs/current/reference/html/container-images.html
FROM package as extract

WORKDIR /build

RUN java -Djarmode=layertools -jar target/app.jar extract --destination target/extracted

################################################################################

# Create a new stage for running the application that contains the minimal
# runtime dependencies for the application. This often uses a different base
# image from the install or build stage where the necessary files are copied
# from the install stage.
#
# The example below uses eclipse-turmin's JRE image as the foundation for running the app.
# By specifying the "17-jre-jammy" tag, it will also use whatever happens to be the
# most recent version of that tag when you build your Dockerfile.
# If reproducibility is important, consider using a specific digest SHA, like
# eclipse-temurin@sha256:99cede493dfd88720b610eb8077c8688d3cca50003d76d1d539b0efc8cca72b4.
FROM eclipse-temurin:21-jre-jammy AS final

# Create a non-privileged user that the app will run under.
# See https://docs.docker.com/go/dockerfile-user-best-practices/
ARG UID=10001
RUN adduser \
    --disabled-password \
    --gecos "" \
    --home "/nonexistent" \
    --shell "/sbin/nologin" \
    --no-create-home \
    --uid "${UID}" \
    appuser
USER appuser

# Copy the executable from the "package" stage.
COPY --from=extract build/target/extracted/dependencies/ ./
COPY --from=extract build/target/extracted/spring-boot-loader/ ./
COPY --from=extract build/target/extracted/snapshot-dependencies/ ./
COPY --from=extract build/target/extracted/application/ ./

EXPOSE 8080

ENTRYPOINT [ "java", "org.springframework.boot.loader.launch.JarLauncher" ]Note示例仓库中包含了一个
docker-compose.yml文件。以下说明使用的是推荐的compose.yaml文件名——两者都受 Docker Compose 支持。
创建一个名为 compose.yaml 的文件,内容如下。
# Comments are provided throughout this file to help you get started.
# If you need more help, visit the Docker Compose reference guide at
# https://docs.docker.com/go/compose-spec-reference/

# Here the instructions define your application as a service called "server".
# This service is built from the Dockerfile in the current directory.
# You can add other services your application may depend on here, such as a
# database or a cache. For examples, see the Awesome Compose repository:
# https://github.com/docker/awesome-compose
services:
  server:
    build:
      context: .
    ports:
      - 8080:8080
# The commented out section below is an example of how to define a PostgreSQL
# database that your application can use. `depends_on` tells Docker Compose to
# start the database before your application. The `db-data` volume persists the
# database data between container restarts. The `db-password` secret is used
# to set the database password. You must create `db/password.txt` and add
# a password of your choosing to it before running `docker compose up`.
#     depends_on:
#       db:
#         condition: service_healthy
#   db:
#     image: postgres:18
#     restart: always
#     user: postgres
#     secrets:
#       - db-password
#     volumes:
#       - db-data:/var/lib/postgresql
#     environment:
#       - POSTGRES_DB=example
#       - POSTGRES_PASSWORD_FILE=/run/secrets/db-password
#     expose:
#       - 5432
#     healthcheck:
#       test: [ "CMD", "pg_isready" ]
#       interval: 10s
#       timeout: 5s
#       retries: 5
# volumes:
#   db-data:
# secrets:
#   db-password:
# file: db/password.txt创建一个名为 .dockerignore 的文件,内容如下。
# Include any files or directories that you don't want to be copied to your
# container here (e.g., local build artifacts, temporary files, etc.).
#
# For more help, visit the .dockerignore file reference guide at
# https://docs.docker.com/go/build-context-dockerignore/

**/.classpath
**/.dockerignore
**/.env
**/.git
**/.gitignore
**/.project
**/.settings
**/.toolstarget
**/.vs
**/.vscode
**/.next
**/.cache
**/*.*proj.user
**/*.dbmdl
**/*.jfm
**/charts
**/docker-compose*
**/compose.y*ml
**/target
**/Dockerfile*
**/node_modules
**/npm-debug.log
**/obj
**/secrets.dev.yaml
**/values.dev.yaml
**/vendor
LICENSE
README.md现在你的 spring-petclinic 目录中应该有以下三个文件。
运行应用程序
在 spring-petclinic 目录中,在终端运行以下命令。
$ docker compose up --build
首次构建并运行该应用时,Docker 会下载依赖并构建应用。根据你的网络连接情况,这可能需要几分钟时间。
打开浏览器,在 http://localhost:8080 查看应用程序。你应该会看到一个宠物诊所的简单应用。
在终端中,按 ctrl+c 停止应用程序。
在后台运行应用程序
你可以通过添加 -d 选项,让应用程序脱离终端在后台运行。在 spring-petclinic 目录中,在终端运行以下命令。
$ docker compose up --build -d
打开浏览器,在 http://localhost:8080 查看应用程序。你应该会看到一个宠物诊所的简单应用。
在终端中,运行以下命令以停止应用程序。
$ docker compose down
有关 Compose 命令的更多信息,请参阅 Compose CLI 参考。
用容器进行 Java 开发
先决条件
请先完成将应用容器化中的步骤。
概览
在本节中,你将为上一节中容器化的应用程序搭建一个本地开发环境。这包括:
- 添加本地数据库并持久化数据
- 创建用于连接调试器的开发容器
- 配置 Compose,在你编辑并保存代码时自动更新正在运行的 Compose 服务
添加本地数据库并持久化数据
你可以使用容器来搭建本地服务,例如数据库。在本节中,你将更新 docker-compose.yaml 文件,定义一个数据库服务以及一个用于持久化数据的卷。此外,该应用程序使用一个系统属性来定义数据库类型,因此你还需要更新 Dockerfile,以便在启动应用时传入该系统属性。
在克隆仓库的目录中,用 IDE 或文本编辑器打开 docker-compose.yaml 文件。你的 Compose 文件中已经有一个数据库服务的示例,但针对你的具体应用还需要做几处修改。
在 docker-compose.yaml 文件中,你需要执行以下操作:
- 取消注释所有数据库相关的指令。你现在将使用数据库服务,而不是使用本地存储来保存数据。
- 删除顶层的
secrets元素,以及db服务内部的secrets元素。本示例使用环境变量来设置密码,而不是使用 secrets。 - 从
db服务中删除user元素。本示例在环境变量中指定用户。 - 更新数据库环境变量。这些变量由 Postgres 镜像定义。更多细节请参阅 Postgres 官方 Docker 镜像。
- 更新
db服务的健康检查测试并指定用户。默认情况下,健康检查使用 root 用户,而不是你定义的petclinic用户。 - 在
server服务中将数据库 URL 添加为环境变量。这会覆盖spring-petclinic/src/main/resources/application-postgres.properties中定义的默认值。
以下是更新后的 docker-compose.yaml 文件。所有注释均已移除。
services:
  server:
    build:
      context: .
    ports:
      - 8080:8080
    depends_on:
      db:
        condition: service_healthy
    environment:
      - POSTGRES_URL=jdbc:postgresql://db:5432/petclinic
  db:
    image: postgres:18
    restart: always
    volumes:
      - db-data:/var/lib/postgresql
    environment:
      - POSTGRES_DB=petclinic
      - POSTGRES_USER=petclinic
      - POSTGRES_PASSWORD=petclinic
    ports:
      - 5432:5432
    healthcheck:
      test: ["CMD", "pg_isready", "-U", "petclinic"]
      interval: 10s
      timeout: 5s
      retries: 5
volumes:
  db-data:
在 IDE 或文本编辑器中打开 Dockerfile。在 ENTRYPOINT 指令中,更新该指令,按照 spring-petclinic/src/resources/db/postgres/petclinic_db_setup_postgres.txt 文件中的说明传入系统属性。
- ENTRYPOINT [ "java", "org.springframework.boot.loader.launch.JarLauncher" ]
+ ENTRYPOINT [ "java", "-Dspring.profiles.active=postgres", "org.springframework.boot.loader.launch.JarLauncher" ]
保存并关闭所有文件。
现在,运行以下 docker compose up 命令来启动你的应用程序。
$ docker compose up --build
打开浏览器,在 http://localhost:8080 查看应用程序。你应该会看到一个宠物诊所的简单应用。在应用中浏览一下。进入 Veterinarians(兽医) 页面,并通过能够列出兽医信息来验证应用程序已连接到数据库。
在终端中,按 ctrl+c 停止应用程序。
用于开发的 Dockerfile
你现在的 Dockerfile 非常适合生成一个只包含运行应用程序所需组件的小型安全生产镜像。在开发时,你可能想要一个具备不同环境的镜像。
例如,在开发镜像中,你可能希望配置镜像以启动应用程序,从而能够将调试器连接到正在运行的 Java 进程。
与其管理多个 Dockerfile,不如添加一个新的阶段。这样你的 Dockerfile 既能生成可用于生产的最终镜像,也能生成用于开发的镜像。
将你的 Dockerfile 内容替换为以下内容。
# syntax=docker/dockerfile:1

FROM eclipse-temurin:21-jdk-jammy as deps
WORKDIR /build
COPY --chmod=0755 mvnw mvnw
COPY .mvn/ .mvn/
RUN --mount=type=bind,source=pom.xml,target=pom.xml \
    --mount=type=cache,target=/root/.m2 ./mvnw dependency:go-offline -DskipTests

FROM deps as package
WORKDIR /build
COPY ./src src/
RUN --mount=type=bind,source=pom.xml,target=pom.xml \
    --mount=type=cache,target=/root/.m2 \
    ./mvnw package -DskipTests && \
    mv target/$(./mvnw help:evaluate -Dexpression=project.artifactId -q -DforceStdout)-$(./mvnw help:evaluate -Dexpression=project.version -q -DforceStdout).jar target/app.jar

FROM package as extract
WORKDIR /build
RUN java -Djarmode=layertools -jar target/app.jar extract --destination target/extracted

FROM extract as development
WORKDIR /build
RUN cp -r /build/target/extracted/dependencies/. ./
RUN cp -r /build/target/extracted/spring-boot-loader/. ./
RUN cp -r /build/target/extracted/snapshot-dependencies/. ./
RUN cp -r /build/target/extracted/application/. ./
ENV JAVA_TOOL_OPTIONS -agentlib:jdwp=transport=dt_socket,server=y,suspend=n,address=*:8000
CMD [ "java", "-Dspring.profiles.active=postgres", "org.springframework.boot.loader.launch.JarLauncher" ]

FROM eclipse-temurin:21-jre-jammy AS final
ARG UID=10001
RUN adduser \
    --disabled-password \
    --gecos "" \
    --home "/nonexistent" \
    --shell "/sbin/nologin" \
    --no-create-home \
    --uid "${UID}" \
    appuser
USER appuser
COPY --from=extract build/target/extracted/dependencies/ ./
COPY --from=extract build/target/extracted/spring-boot-loader/ ./
COPY --from=extract build/target/extracted/snapshot-dependencies/ ./
COPY --from=extract build/target/extracted/application/ ./
EXPOSE 8080
ENTRYPOINT [ "java", "-Dspring.profiles.active=postgres", "org.springframework.boot.loader.launch.JarLauncher" ]
保存并关闭 Dockerfile。
在 Dockerfile 中,你基于 extract 阶段添加了一个名为 development 的新阶段。在该阶段中,你将提取的文件复制到一个公共目录,然后运行一个命令来启动应用程序。在该命令中,你开放了 8000 端口,并声明了 JVM 的调试配置,以便你能够附加调试器。
使用 Compose 进行本地开发
当前的 Compose 文件不会启动你的开发容器。要做到这一点,你必须更新 Compose 文件,使其目标指向开发阶段。同时,更新 server 服务的端口映射,以便为调试器提供访问入口。
打开 docker-compose.yaml,并将以下指令添加到文件中。
services:
  server:
    build:
      context: .
      target: development
    ports:
      - 8080:8080
      - 8000:8000
    depends_on:
      db:
        condition: service_healthy
    environment:
      - POSTGRES_URL=jdbc:postgresql://db:5432/petclinic
  db:
    image: postgres:18
    restart: always
    volumes:
      - db-data:/var/lib/postgresql
    environment:
      - POSTGRES_DB=petclinic
      - POSTGRES_USER=petclinic
      - POSTGRES_PASSWORD=petclinic
    ports:
      - 5432:5432
    healthcheck:
      test: ["CMD", "pg_isready", "-U", "petclinic"]
      interval: 10s
      timeout: 5s
      retries: 5
volumes:
  db-data:
现在,启动你的应用程序并确认它正在运行。
$ docker compose up --build
最后,测试你的 API 端点。运行以下 curl 命令:
$ curl  --request GET \
  --url http://localhost:8080/vets \
  --header 'content-type: application/json'
你应该收到如下响应:
{
  "vetList": [
    {
      "id": 1,
      "firstName": "James",
      "lastName": "Carter",
      "specialties": [],
      "nrOfSpecialties": 0,
      "new": false
    },
    {
      "id": 2,
      "firstName": "Helen",
      "lastName": "Leary",
      "specialties": [{ "id": 1, "name": "radiology", "new": false }],
      "nrOfSpecialties": 1,
      "new": false
    },
    {
      "id": 3,
      "firstName": "Linda",
      "lastName": "Douglas",
      "specialties": [
        { "id": 3, "name": "dentistry", "new": false },
        { "id": 2, "name": "surgery", "new": false }
      ],
      "nrOfSpecialties": 2,
      "new": false
    },
    {
      "id": 4,
      "firstName": "Rafael",
      "lastName": "Ortega",
      "specialties": [{ "id": 2, "name": "surgery", "new": false }],
      "nrOfSpecialties": 1,
      "new": false
    },
    {
      "id": 5,
      "firstName": "Henry",
      "lastName": "Stevens",
      "specialties": [{ "id": 1, "name": "radiology", "new": false }],
      "nrOfSpecialties": 1,
      "new": false
    },
    {
      "id": 6,
      "firstName": "Sharon",
      "lastName": "Jenkins",
      "specialties": [],
      "nrOfSpecialties": 0,
      "new": false
    }
  ]
}
连接调试器
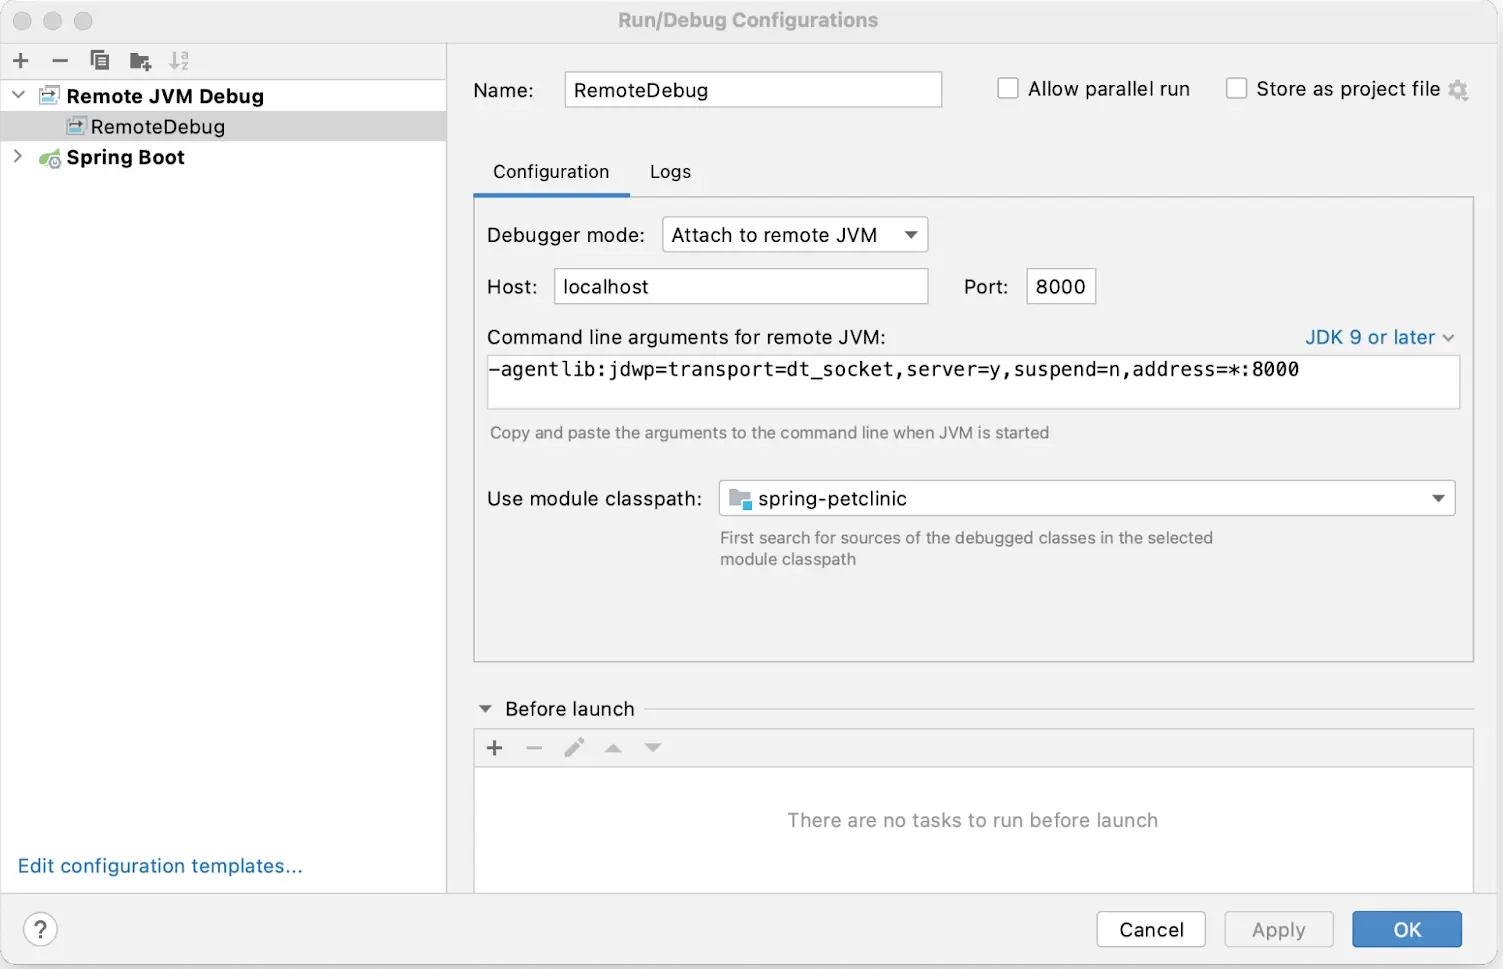
你将使用 IntelliJ IDEA 自带的调试器。你可以使用这个 IDE 的社区版本。在 IntelliJ IDEA 中打开你的项目,进入 Run(运行) 菜单,然后选择 Edit Configuration(编辑配置)。添加一个类似于以下配置的 Remote JVM Debug(远程 JVM 调试)配置:
设置断点。
打开 src/main/java/org/springframework/samples/petclinic/vet/VetController.java,并在 showResourcesVetList 函数内部添加一个断点。
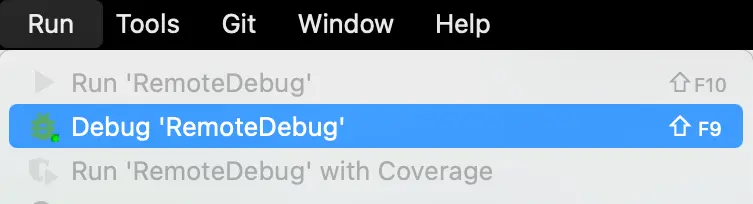
要开始你的调试会话,请选择 Run(运行) 菜单,然后选择 Debug NameOfYourConfiguration(调试_你的配置名称_)。
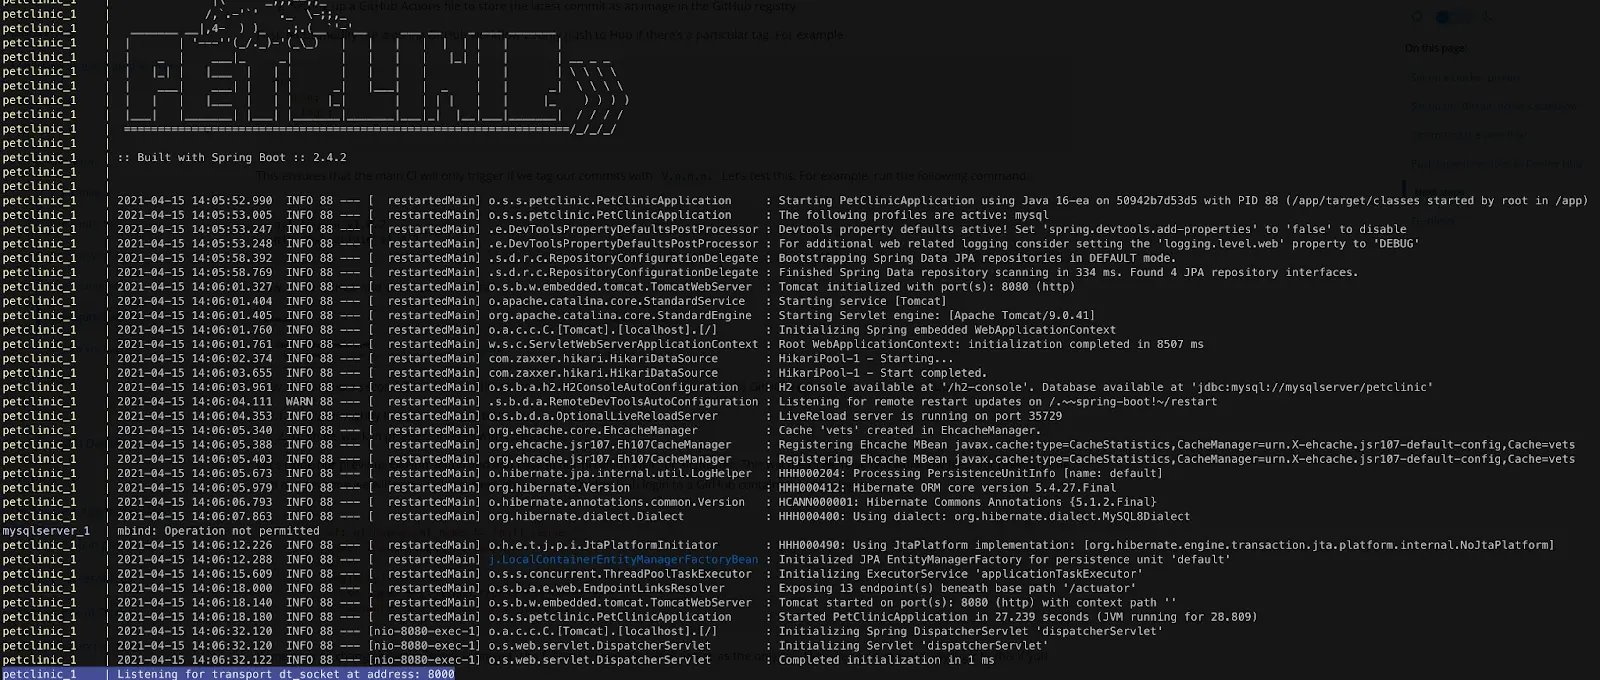
你现在应该能在 Compose 应用程序的日志中看到连接信息。
你现在可以调用服务器端点了。
$ curl --request GET --url http://localhost:8080/vets
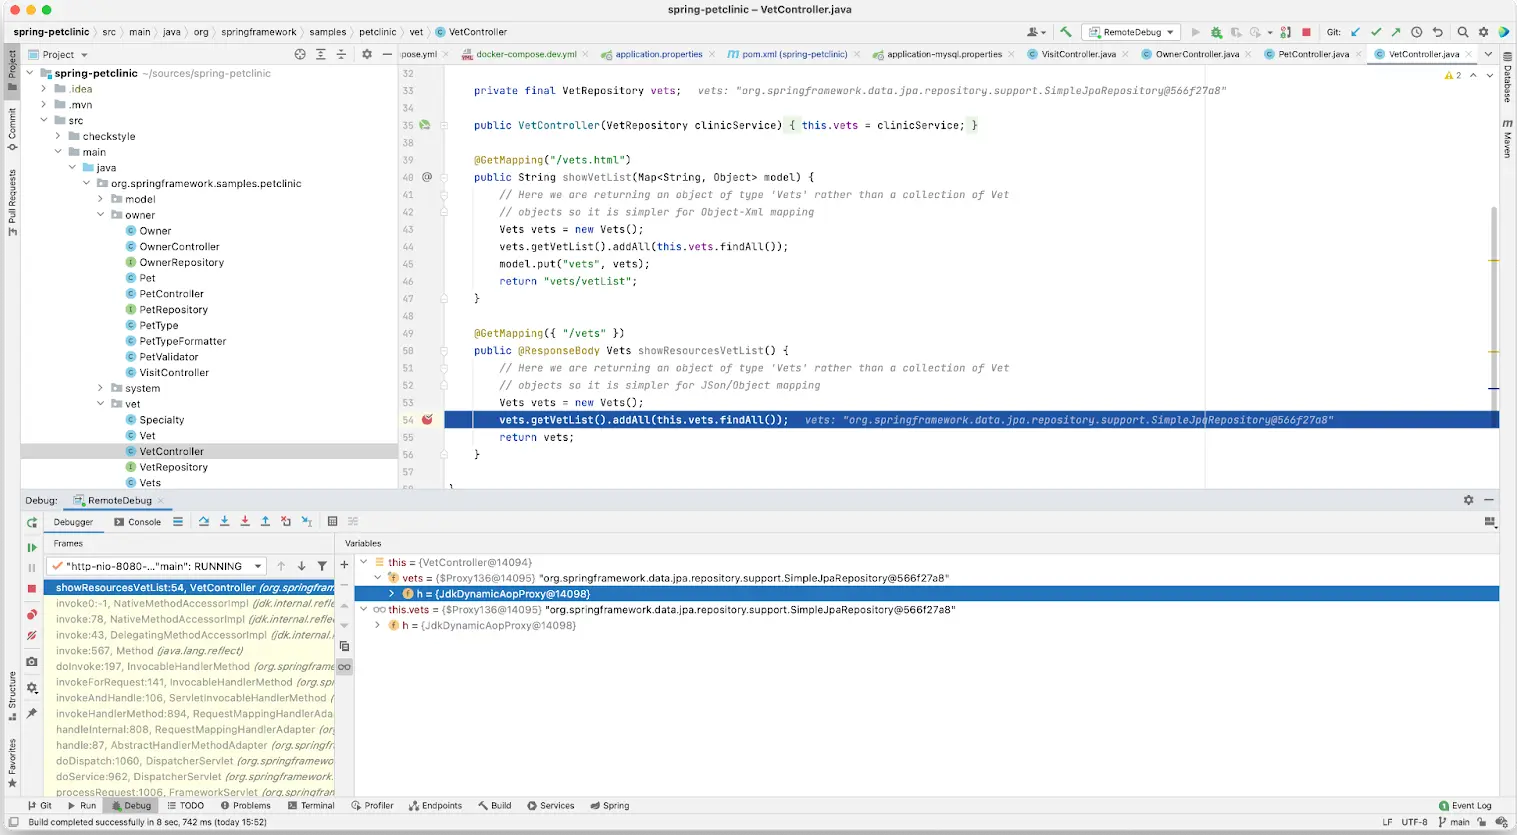
你应该会看到代码在标记行处中断,现在你就可以像平常一样使用调试器了。你还可以检查和监视变量、设置条件断点、查看堆栈跟踪,以及做一大堆其他事情。
在终端中按 ctrl+c 停止你的应用程序。
自动更新服务
使用 Compose Watch,在你编辑并保存代码时自动更新正在运行的 Compose 服务。有关 Compose Watch 的更多细节,请参阅 使用 Compose Watch。
在 IDE 或文本编辑器中打开你的 docker-compose.yaml 文件,然后添加 Compose Watch 指令。以下是更新后的 docker-compose.yaml 文件。
services:
  server:
    build:
      context: .
      target: development
    ports:
      - 8080:8080
      - 8000:8000
    depends_on:
      db:
        condition: service_healthy
    environment:
      - POSTGRES_URL=jdbc:postgresql://db:5432/petclinic
    develop:
      watch:
        - action: rebuild
          path: .
  db:
    image: postgres:18
    restart: always
    volumes:
      - db-data:/var/lib/postgresql
    environment:
      - POSTGRES_DB=petclinic
      - POSTGRES_USER=petclinic
      - POSTGRES_PASSWORD=petclinic
    ports:
      - 5432:5432
    healthcheck:
      test: ["CMD", "pg_isready", "-U", "petclinic"]
      interval: 10s
      timeout: 5s
      retries: 5
volumes:
  db-data:
运行以下命令,使用 Compose Watch 运行你的应用程序。
$ docker compose watch
打开 Web 浏览器,在 http://localhost:8080 查看应用程序。你应该会看到 Spring Pet Clinic 主页。
你本地机器上对应用程序源文件的任何更改,现在都会自动反映到正在运行的容器中。
用 IDE 或文本编辑器打开 spring-petclinic/src/main/resources/templates/fragments/layout.html,并通过添加一个感叹号来更新 Home 导航字符串。
-   <li th:replace="~{::menuItem ('/','home','home page','home','Home')}">
+   <li th:replace="~{::menuItem ('/','home','home page','home','Home!')}">
保存对 layout.html 的更改,然后你就可以在容器自动重建的同时继续开发。
在容器重建并运行后,刷新 http://localhost:8080,然后验证菜单中现在显示了 Home!(首页!)。
在终端中按 ctrl+c 停止 Compose Watch。
运行你的 Java 测试
先决条件
完成本指南的所有前面章节,从将 Java 应用程序容器化开始。
概览
测试是现代软件开发中不可或缺的一部分。对不同的开发团队来说,测试可以有很多含义。有单元测试、集成测试和端到端测试。在本指南中,你将了解如何在 Docker 中运行你的单元测试。
用于测试的多阶段 Dockerfile
在下面的示例中,你将把测试命令整合到你的 Dockerfile 中。将你的 Dockerfile 内容替换为以下内容。
# syntax=docker/dockerfile:1

FROM eclipse-temurin:21-jdk-jammy as base
WORKDIR /build
COPY --chmod=0755 mvnw mvnw
COPY .mvn/ .mvn/

FROM base as test
WORKDIR /build
COPY ./src src/
RUN --mount=type=bind,source=pom.xml,target=pom.xml \
    --mount=type=cache,target=/root/.m2 \
    ./mvnw test

FROM base as deps
WORKDIR /build
RUN --mount=type=bind,source=pom.xml,target=pom.xml \
    --mount=type=cache,target=/root/.m2 \
    ./mvnw dependency:go-offline -DskipTests

FROM deps as package
WORKDIR /build
COPY ./src src/
RUN --mount=type=bind,source=pom.xml,target=pom.xml \
    --mount=type=cache,target=/root/.m2 \
    ./mvnw package -DskipTests && \
    mv target/$(./mvnw help:evaluate -Dexpression=project.artifactId -q -DforceStdout)-$(./mvnw help:evaluate -Dexpression=project.version -q -DforceStdout).jar target/app.jar

FROM package as extract
WORKDIR /build
RUN java -Djarmode=layertools -jar target/app.jar extract --destination target/extracted

FROM extract as development
WORKDIR /build
RUN cp -r /build/target/extracted/dependencies/. ./
RUN cp -r /build/target/extracted/spring-boot-loader/. ./
RUN cp -r /build/target/extracted/snapshot-dependencies/. ./
RUN cp -r /build/target/extracted/application/. ./
ENV JAVA_TOOL_OPTIONS="-agentlib:jdwp=transport=dt_socket,server=y,suspend=n,address=*:8000"
CMD [ "java", "-Dspring.profiles.active=postgres", "org.springframework.boot.loader.launch.JarLauncher" ]

FROM eclipse-temurin:21-jre-jammy AS final
ARG UID=10001
RUN adduser \
    --disabled-password \
    --gecos "" \
    --home "/nonexistent" \
    --shell "/sbin/nologin" \
    --no-create-home \
    --uid "${UID}" \
    appuser
USER appuser
COPY --from=extract build/target/extracted/dependencies/ ./
COPY --from=extract build/target/extracted/spring-boot-loader/ ./
COPY --from=extract build/target/extracted/snapshot-dependencies/ ./
COPY --from=extract build/target/extracted/application/ ./
EXPOSE 8080
ENTRYPOINT [ "java", "-Dspring.profiles.active=postgres", "org.springframework.boot.loader.launch.JarLauncher" ]
首先,你添加了一个新的 base 阶段。在 base 阶段中,你添加了 test 阶段和 deps 阶段都需要用到的通用指令。
接下来,你基于 base 阶段添加了一个名为 test 的新阶段。在该阶段中,你复制了必要的源文件,然后使用 RUN 来运行 ./mvnw test。这里你用的是 RUN 而不是 CMD 来运行测试。原因是 CMD 指令在容器运行时执行,而 RUN 指令在镜像构建时执行。使用 RUN 时,如果测试失败,构建也会失败。
最后,你将 deps 阶段更新为基于 base 阶段,并移除了现在已经放进 base 阶段的那些指令。
运行以下命令,以 test 阶段为目标构建新镜像并查看测试结果。加上 --progress=plain 以查看构建输出,--no-cache 以确保测试始终运行,--target test 以目标指向 test 阶段。
现在,构建你的镜像并运行测试。你将运行 docker build 命令,并添加 --target test 标志,以便专门运行测试构建阶段。
$ docker build -t java-docker-image-test --progress=plain --no-cache --target=test .
你应该会看到包含以下内容的输出
...

#15 101.3 [WARNING] Tests run: 45, Failures: 0, Errors: 0, Skipped: 2
#15 101.3 [INFO]
#15 101.3 [INFO] ------------------------------------------------------------------------
#15 101.3 [INFO] BUILD SUCCESS
#15 101.3 [INFO] ------------------------------------------------------------------------
#15 101.3 [INFO] Total time:  01:39 min
#15 101.3 [INFO] Finished at: 2024-02-01T23:24:48Z
#15 101.3 [INFO] ------------------------------------------------------------------------
#15 DONE 101.4s